/ Chocolate Resources / Chocolate Blog / The Life and Times of Chocolate
The Life and Times of Chocolate

Thanks to Fernanda Frick for the awesome illustrations
We are excited to tell you about our new collaboration with Megan Giller of Chocolate Noise! With the rapid growth the bean to bar chocolate industry has experienced in the past 10 years, it’s apparent that there is a lack of clarity around chocolate and cacao, which creates confusion for consumers.
We created a series of chocolate infographics. Our goal is to help to simplify understanding about where chocolate comes from and the skill of those that make it and work with it to create the bars and bonbons we all enjoy. We hope to tell story as simply as possible, and while we may not capture all of the nuances of post-harvest and factory processes, we hope people remember the image.
I was asked to come to my sons’ preschool and tell them a bit about chocolate. When I asked the class of 3 and 4 year olds where chocolate comes from, the resounding answer was “the chocolate factory.” What’s interesting is that I’m sure many adults would have a similar answer. The chocolate we grew up eating was made by large multi-national companies, and telling the story about where chocolate actually comes from wasn’t part of their marketing strategy.
So it's not surprising that most of us have no idea that chocolate even comes from a tree, and that it’s grown by farmers. The “chocolate factory” is an important part of the story, and the answer isn’t wrong. It’s just not where the story begins.
So, the first infographic is called “How Chocolate is Born” and tells the story of chocolate BEFORE it arrives in the hands of a chocolate maker. It isn’t “chocolate” yet, but cacao pods growing on a tree. The cacao pods are cracked, and the beans are harvested. And then, as Megan from Chocolate Noise says, our friend the cacao bean gets chocolate-wasted off fermented cacao-pulp martinis and tans in the sun until he’s all dried out.
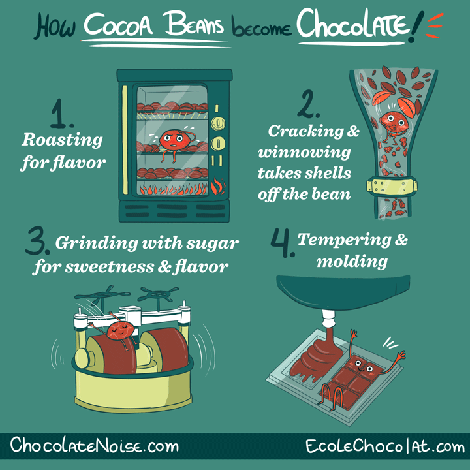
The second infographic in the series is called “How Cocoa Beans Become Chocolate” where the beans arrive in the hands of the chocolate maker for their epic journey to become chocolate! First they enjoy a few minutes in the oven getting toasted brown and chocolaty. Then the beans are cracked and their outer shell winnowed away leaving their inner naked bean selves (called nibs) exposed to the world. After that, it’s a trip to the grinder with sugar and sometimes extra cocoa butter and/or vanilla for sweetness and flavor. Then the chocolate is “tempered”, a process in that uses temperature and motion to make sure the chocolate hardens shiny and stable. And last but not least, the chocolate is molded into bars!
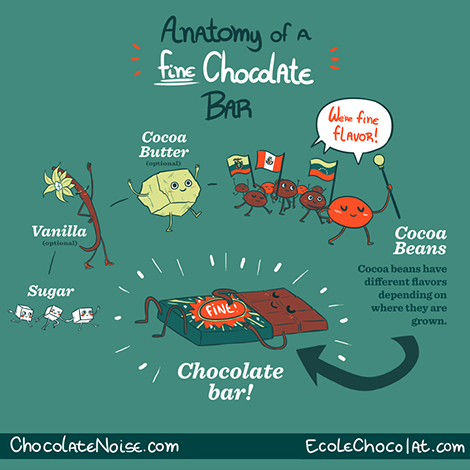
The third infographic in the series is called “Anatomy of a Fine Chocolate Bar” where we see the ingredients found in a bar of fine chocolate dancing behind their fearless leader, our beloved cocoa bean that has become our mascot on this chocolate journey! Cocoa beans have different flavors depending on where they are grown in the world - just like wine, the region can impact the flavor. Fine flavor cocoa beans are of a higher quality - they simply result in a better tasting chocolate than what we call "bulk beans" that are found in mass produced chocolate candy.
Notice what ingredients are illustrated here - it's a pretty short and simple list. And equally important - notice what ingredients are NOT there - no ingredients that you can't understand, or additives that don't need to be there. As with most food, the fewer ingredients you see on the label and the simpler they are, the better it's going to be.
It's important to note that not all fine chocolate includes added cocoa butter and vanilla. Many bean to bar chocolate makers simply use cocoa beans and sugar - these bars are still considered "fine chocolate". However many chocolate makers DO add cocoa butter, and vanilla, so we wanted to reflect commonly found ingredients in our illustration. There is also fine milk chocolate and fine white chocolate. For a longer discussion about the definition of "fine" chocolate, visit the Fine Chocolate Industry Association website.
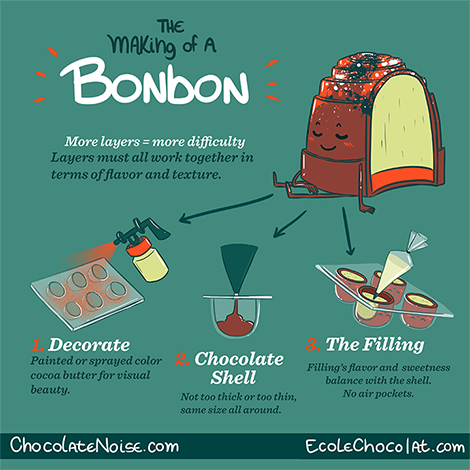
The fourth infographic in the series is called “The Making of a Bonbon”. With Valentine’s Day less than a week away, we know many of you will be buying and eating bonbons and other types of chocolate confections in the near future! This image gives you a glimpse into the processes and talent that goes into making something that most of us pop into our mouths and devour in one bite.
What is a bonbon?
What exactly is a "bonbon"? We used this French term for any filled chocolate in order to differentiate filled chocolates from chocolate bars or confections such as lollipops, marshmallows, turtles, caramels (not covered in chocolate), etc. when developing our curriculum for the Professional Chocolatier Program in 2002. Using the term "chocolates" got confusing when we were talking about "chocolate" in the same sentence, so we decided to use "bonbon" to differentiate when we were specifically talking about filled chocolates. Its been a life saver in clarifying the differences between chocolate products.
The "filling" in a bonbon (i.e. a filled chocolate), can be created from a number of different recipes. Your bonbon could be filled with a truffle recipe, which is typically a cream and chocolate emulsion called ganache, but could also be made by emulsifying chocolate with fruit puree, caramel, olive oil or even just plain water. Then the chocolatier might just call it a truffle (but again, its a filled chocolate so to us it would also be called a bonbon). Other filling recipes include caramel, creams, fruit purees, nut pastes, praliné (a paste of nuts and caramelized sugar) and more - even multiple layers of multiple goodness. The imagination of the chocolatier brings these flavors and textures to life in each tiny bonbon bundle!
The Making of a Bonbon
Now back to our infographic "The Making of a Bonbon". It’s important to note that this image only shows ONE of the many ways to decorate a bonbon. This is just the beginning of where the art, skill and individuality of the chocolatier comes into play. Before making the actual physical bonbon, there is a whole process to develop the recipe – choosing a chocolate for the outer shell, and deciding what kind of filling would pair well with that chocolate. The flavors and textures of the filling or fillings have to balance well with each other and with the chocolate.
Then comes the craftsmanship of making the bonbon to ensure that each and every piece is perfectly made. And then decorating is another opportunity for the chocolatier to showcase their individual style. Some chocolatiers choose not to decorate their bonbons at all, particularly if they have a really intricate and pretty mold, or the simple perfectly enrobed square. Or some chocolatiers decorate with something else, and there are almost endless possibilities, such as gold leaf, or edible flowers. We all know that we eat with our eyes first, and it’s often visual beauty of a piece of chocolate that first attracts our attention before we even take a bite. Different decorating techniques are one way for chocolatiers to differentiate themselves – a way to make your salted caramel look different from everyone else’s.
As you can see from our bonbon infographic, there are many steps to crafting a perfect bonbon. You might think that decorating the outside would be the last step, but it’s actually the FIRST step in some molded chocolates! Many chocolatiers use a special gun that sprays colored cocoa butter into their chocolate molds. Some may use more than one color to create a layered effect that is really pretty.

Then the mold is filled with a layer of chocolate – chocolatiers will fill the mold cavity with chocolate and then tip it upside down so that all the excess chocolate runs out and you are left with a perfect outer shell that is not too thick or too thin. After the chocolate shell has hardened, the filling is added but not quite to the top leaving room for the capping. Sometimes there are multiple layers, such as a ganache layer and then a caramel layer. Every layer adds to the level of difficulty in creating a perfect piece. Then the cap of chocolate is added (it's really the bottom of the bonbon) and the excess chocolate is scraped off, and again, the chocolatier wants to make sure that the bottom is not too thick or too thin.
If you want to see some more beautiful examples of bonbons, check out our blog post about some of our favorite chocolate Instagram accounts!
Want to learn more about making delicious chocolates and confections? Check out our Professional Chocolatier Program!
Get reminders about upcoming classes! To receive program updates and news, click the link below.
Photography by Jessica Washburn, Bliss Chocolatier and Ecole Chocolat
Quick Site Nav


Contact Us
Email: info@ecolechocolat.com
Visits by appointment only:
505 Montgomery
San Francisco, CA U.S.
1-213-291-8309
Canadian or International
1666 West 2nd Ave
Vancouver, B.C. Canada
1-604-484-1872
Ecole Chocolat is a woman-owned and operated chocolate education organization. Founded by chocolatier, Pam Williams, we are the professional school of chocolate arts for both chocolatiers and chocolate makers. We also donate our time, leadership, expertise and funds to preserve the fine chocolate industry and save fine cacao.