/ Chocolate Resources / Chocolate Making Lessons / Lesson—Creating Chocolate Bonbons Using a Mold
Lesson—Creating Chocolate Bonbons Using a Mold

Chocolate molds have been around since chocolate consumption moved from predominately drinking chocolate to predominately eating chocolate. In order to produce bite-size chocolate pieces for eating, the large blocks of chocolate have to be molded into smaller forms.
In the late 1800s, creating fanciful chocolate molds of metal was at its height. Small bakers and chocolatiers produced intricate shapes, both flat and three-dimensional. The introduction of plastic molds revolutionized both the industrial and home markets. Now plastic molds, usually based on historical designs first done in metal, can be produced inexpensively.
How to buy chocolate molds, look for strong plastic with deep intricate designs. These will produce a much more elegant product than the shallow molds you’ll usually find in craft or kitchen stores. The molds should never be washed in soap. Just use hot water. Soap scum can mar the taste of the chocolate if not thoroughly removed. If your chocolate is tempered properly, most of the chocolate can be flaked off with a soft cloth.
After the finished chocolate is removed from the mold, it leaves a light film of cocoa butter which makes the next chocolate made in the mold gleam even more.

The Chocolate Molding Process
You'll need to have mastered tempering chocolate before you attempt to mold with it. Put out your molds, utensils (ladle, spoons, pastry scraper or pallet knife, piping bag) and parchment paper or silpat mat before you temper your chocolate so you can start molding right away.
Try to buy at least two of each kind of mold as this allows you to work on one mold while the other is hardening. When molding, you want to work as quickly as possible and remember to stir your tempered chocolate a lot during the process as it will tend to loose its temper and start to solidify if left alone. Remember that chocolate hates to be ignored.
Step 1: Fill the Mold
Quickly fill your mold cavities using either a ladle or spoon. Don’t worry if you have chocolate all over the mold as you’re going to scrape off all the excess later. Once the cavities are full, tap the mold briskly on the table to settle the chocolate into any grooves or designs in the cavity and to force out air bubbles.
Step 2: For Solid, Molded Chocolate Shapes
Scrape off the excess using a pastry scraper or pallet knife. Tap the mold on the table again to settle the chocolate into the cavities. Place the mold (cavity side up) on a flat cool surface to harden.
A note about achieving perfect detail if your mold cavity is very detailed: To reduce the risk of small bubbles marring the mold detail, you can paint the mold cavities with a thin coat of tempered chocolate using a soft brush before proceeding to fill the molds.
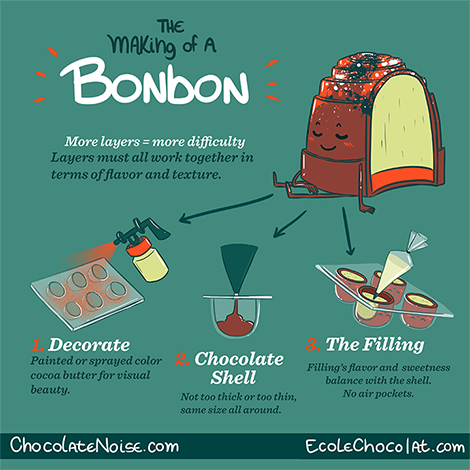
Step 2: For Shell Molds to Be Filled with Your Truffle or Candy Mixture
Quickly fill your mold cavities using either a ladle or spoon and then turn the mold over your bowl of chocolate and let the excess chocolate run out of the cavities, leaving a thin coating of chocolate. Tap the bottom of the mold gently to release more chocolate during this process.
Turn the mold upright and scrape off the excess across the surface of the mold using a pastry scraper or pallet knife. A little of the scraped chocolate might run into the cavities but that is fine. Turn the mold over again and place it (cavity side up) on parchment paper or silpat mat to harden.
Filling the chocolate cavity: Make your favorite chocolate truffle recipe and have it in a plastic or parchment piping bag. When the chocolate-lined cavities have hardened, pipe the mixture into the cavity making sure not to fill more than 3/4 to 7/8 of the way up the sides of the cavity. Try hard not to get any filling on the outer rim of the chocolate. This is where the piping bag works great.
If you do get some filling on the edge of the chocolate, scrape it off immediately because it will keep your chocolate bottom from adhering properly. When all the cavities are filled, set the filled shells aside for a few minutes to let the filling settle and form a slightly dry skin on the top. When the shells are ready, ladle chocolate across the top of the mold as before and then use a pastry scraper or pallet knife to quickly scrape off the excess chocolate. Place the filled mold (cavity side up) on a flat, cool surface to harden.
Step 3: Hardening Your Molds
If you don’t have a cool room or cupboard in which to harden the chocolate in the molds or are pressed for time, you can use the refrigerator to speed up the process. Set aside one shelf in the fridge and have it empty before you start tempering the chocolate and molding. Once the mold is full, put it on the shelf and set a timer for five minutes. Remove the mold from the refrigerator and let it continue hardening at cool room temperature.
The chocolates are ready to be released when the chocolate pulls away from the mold slightly and the outside of the cavity appears grayish if you look at the bottom of the mold. This is an indication that air is being pulled in between the chocolate and the mold as the chocolate contracts and hardens.
Once you think the mold is ready, turn it over on parchment paper or a Silpat mat. If your chocolate is tempered properly and it is completely hardened, the chocolates should just fall out of the mold. If they don’t, give the mold a little tap on the bottom to help release the chocolates. If that doesn’t work, then set them aside and check later.
You can return them to the refrigerator, but again, not for more than three minutes — so set the timer. The problem with leaving the filled molds in the refrigerator for too long is that the cold environment will start to pull the sugar in the chocolate itself to the surface, which is up against the mold. The sugar will adhere to the mold and make it very difficult to remove the chocolates.
Want to become expert in molding chocolate in order to create beautiful chocolate bonbons, confections and bars, check out our online chocolate program: PROFESSIONAL CHOCOLATIER
If you enjoyed this lesson, you might also like:
The Art of Dipping Chocolate Bonbons
Looking for chocolate molds? Check out our list of Chocolate Mold Suppliers.
Get reminders about upcoming classes! To receive program updates and news, click the link below.
Photography by Jessica Washburn, Bliss Chocolatier and Ecole Chocolat
Quick Site Nav


Contact Us
Email: info@ecolechocolat.com
Visits by appointment only:
505 Montgomery
San Francisco, CA U.S.
1-213-291-8309
Canadian or International
1666 West 2nd Ave
Vancouver, B.C. Canada
1-604-484-1872
Ecole Chocolat is a woman-owned and operated chocolate education organization. Founded by chocolatier, Pam Williams, we are the professional school of chocolate arts for both chocolatiers and chocolate makers. We also donate our time, leadership, expertise and funds to preserve the fine chocolate industry and save fine cacao.